Friday, December 04, 2009
Goodbye Ubuntu, Hello Arch!
I downloaded the 64-bit netinstall version, loaded the beginners' guide from the wiki on my laptop and proceeded to install it on the desktop. It was by no means, a piece of cake, but nothing I couldn't handle.
I already had my disk partitioned as per my needs, so I just needed to erase the Ubuntu Root partition. I have a separate /home partition, but I moved all my dot-hidden files into a separate folder to avoid conflicts.
Here is a list of issues I encountered during installation and configuring:
1) My local timezone was not present in the options provided during installation. So I just chose the closest one (which was about 30 minutes off). After setting up X, I found my timezone in /usr/share/zoneinfo, and made the changes in /etc/rc.conf.
2) When presented with cfdisk during installation, I deleted my ubuntu root partition, and made a new ext3 partition. This, however, didn't erase my partition. The old files from Ubuntu were still there! I didn't realize this at first and thus ended up wasting time. Later on, I just used a GParted LiveCD to delete the partition and reformat to ext3. That took care of it.
(I still don't know what I did wrong with cfdisk. If anyone has any idea, please leave a comment)
3) Post installation: When booting Arch, I would sometimes get a bad superblock error. I realized that this was happening because /devsda and /dev/sdb were getting swapped randomly. So I put in the liveCD and changed the /etc/fstab entries to UUID instead of sda and sdb. (Yeah, I was lazy the first time)
4) eth0 and eth1 are still getting swapped randomly. I use only one ethernet interface at present, so I just configured both with the same settings.
(Edit: found solution here)
Why I chose Arch
I wanted to try out Arch since a long time, but I had a slow internet connection. Recently, I upgraded to a better connection. This was important, since Arch involved a lot of initial downloading.
Arch seems to have a good package repository (though not as large a Ubuntu), which would help me keep the compiling and dependency headaches to a minimum. I've tried out Red Hat, Fedora, Slackware and Ubuntu in the past. I've stuck with Ubuntu for long, and its been my favourite so far. I'd still recommend Ubuntu to newbies.
Arch gives me the power to configure my system any way I like. And I like this kind of power.
First impressions
The wiki pages are comprehensive. The effort taken by the community to keep this updated is mindblowing. Great job guys! I hope I can contribute soon. Also, asking noob-ish questions on the forums seems to invite a lot of hostility :P (Not experienced first hand, I still have to make a forum account)
The concept of the BSD-style /etc/rc.conf is beautiful and simple. Organising and loading daemons is also very simple.
I also find the distro to be faster compared to Ubuntu. But that may be because I've used 'noatime' in my fstab. (Never really tried that option in Ubuntu).
In conclusion
I still have a lot to learn about Arch. It definitely looks promising. I can understand why so many people move to Arch after starting out with Ubuntu. I'm not throwing this as flamebait, its just that Ubuntu and Arch cater to different kinds of users.
Saturday, July 04, 2009
MPlayer remote control using a cellphone and ssh
I recently purchased a Nokia E63 cellphone. With a home wifi connection and an ssh client installed on the phone and after getting over the initial excitement of remote-rickrolling the people in my room, I figured that I could use the phone as a remote for MPlayer. This would allow me to watch movies while sitting comfortably on my bed without the need to get up time and again to adjust the volume or pause the movie. Cool!
Requirements
- A phone with an ssh client and wifi support
- A computer running an ssh server (I use openssh-server on Ubuntu)
- The MPlayer movie player
- The lack of a better infrared or bluetooth remote control
- Boredom
Procedure
- Installing the PuTTY ssh client the phone
- Creating the mplayyerremote user
- Creating the python script mplayerremote.py
- Creating the FIFO pipe
- Modifying the .bashrc file for the user mplayerremote
- Modifying the ~/.mplayer/config file
- Creating an MPlayer Remote profile for PuTTY
The Nokia E63 uses the Symbian S60 3rd Edition. PuTTY for Symbian can be downloaded from here.
It may be an unprivileged user. The only purpose for a new user is convenience. I set a phone-friendly password for this user. The user can be added in Ubuntu via System > Administration > Users and Groups. This will also take care of creating the home directory for the user.
Once the user is created, login as the user from a terminal.
sudo login mplayerremoteOnce logged in, create a file named mplayerremote.py containing the following code:
#!/usr/bin/env python
import curses.wrapper
pipe_location="/home/mplayerremote/rc"
KEY_ENTER=10 #specific to my phone
def main(stdscr):
  stdscr.addstr("MPlayer Remote\n")
  while True:
      pipe=open(pipe_location,'w')
      c=stdscr.getch()
      if c==ord('f'):
          pipe.write("vo_fullscreen"+"\n")
      elif c==curses.KEY_RIGHT:
          pipe.write("seek 10"+"\n")
      elif c==curses.KEY_LEFT:
          pipe.write("seek -10"+"\n")
      elif c==ord('/'):
          pipe.write("seek 600"+"\n")
      elif c==ord('@'):
          pipe.write("seek -600"+"\n")
      elif c==curses.KEY_UP:
          pipe.write("volume +1"+"\n")
      elif c==curses.KEY_DOWN:
          pipe.write("volume -1"+"\n")
      elif c==ord('j'):
          pipe.write("sub_select"+"\n")
      elif c==ord('o'):
          pipe.write("osd"+"\n")
      elif c==ord('p') or c==ord(' ') or int(c)==KEY_ENTER:
          pipe.write("pause"+"\n")
      elif c==ord('q'):
          pipe.write("quit"+"\n")
          break
      pipe.close()

curses.wrapper(main)
The command nano ./mplayerremote.py can be used to create the file. Run chmod +x ./mplayyerremote.py to make the file executable. I have only basic mplayer commands in this script. Feel free to expand it or change it. The commands I've used are:
f: fullscreen
right-arrow : seek forward 10 seconds
left-arrow : seek backward 10 seconds
up-arrow : volume up
down-arrow : volume down
'/' : seek forward 10 minutes
'@' : seek backward 10 minutes
'p' or [space] or [enter] : pause/resume playback
j: cycle through available subtitles
o: toggle osd mode
q: quit the application and mplayer
I have taken advantage of the Qwerty keyboard of the E63. For numeric keypads, this script would suck unless modified to be more convenient. The script makes use of the Curses library to capture the keystrokes
This named pipe allows us to 'talk' to mplayer. Use the following commands while you are still logged in as mplayerremote:
mkfifo rc
chmod a+rw ./rc
The python script assumes that the pipe is located at /home/mplayerremote/rc . Change the pipelocation variable in the script if you choose to put it in any other location
I wanted the mplayerremote.py script to run automatically whenever I logged in as mplayerremote and exit as soon as I quit the application. To do this, I appended the following two lines in the .bashrc file of mplayyerremote's home directory:
/home/mplayerremote/mplayerremote.py
exit
To make mplayer use the named pipe we created, we need to use the -input file=[path_of_pipe] option with mplayer. To avoid writing this every time, we can edit the ~/.mplayer/config file and append the line: input:file=/home/mplayerremote/rc
Note that this ~/.mplayer/config file is in the home directory of your normal user that usually runs mplayer and not the mplayerremote user. mplayerremote user is just the remote control and nothing more.
PuTTY for S60 allows the creation of profiles. I have created a dedicated profile for mplayerremote with the username saved. Setting the Keepalive interval (to 60 or so) may also help prevent disconnections. Effectively, the only thing I have to do to activate my remote is select the PuTTY profile, choose the home wifi connection and enter my (phone-friendly) password for mplayyerremote.
If you plan to use this, please do so at your own risk. Any suggestions and comments are welcome.
Friday, March 27, 2009
keeponline.sh (Yet another one)
Here's the latest one. It is now capable of checking if one instance is already running, and won't start another one unnecessarily:
#!/bin/bash
#echo "Going Online..."
#/usr/local/bin/online.sh > /dev/null
LOCKFILE="/var/lock/keeponline.lock"
trap "{ echo $0 removing lock; rm -f $LOCKFILE; exit 255; }" SIGINT SIGTERM
if [ -f $LOCKFILE ]; then
      echo "$0: already running, exiting..."
      exit 1
fi
touch $LOCKFILE
while true; do
      ping -c 2 -W 120 www.google.com > /dev/null

      if [ "$?" = "0" ]; then
              echo "You are connected"
      else
              /usr/local/bin/online.sh > /dev/null
              echo "Disconnect detected at `date`, reconnecting" >>  /home/akshay/logs/keeponline.log
      fi
      sleep 10m
done
There is no real use for this script, since SuperSify provides this feature. But I found that my version has less number of false positives when the bandwidth is completely choked. Besides, I just wanted to learn how to use traps :)
Thursday, March 26, 2009
How I increased sound volume in ubuntu
I have an NVidia nForce 630i board and I'm using the onboard sound card:
00:0a.0 PCI bridge: nVidia Corporation MCP73 PCI Express bridge (rev a1)
For some strange reason, I see four mixer devices:
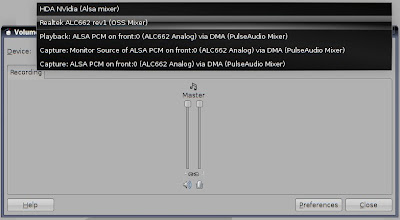
I use pulseaudio as my default sound server. Here's what I did:
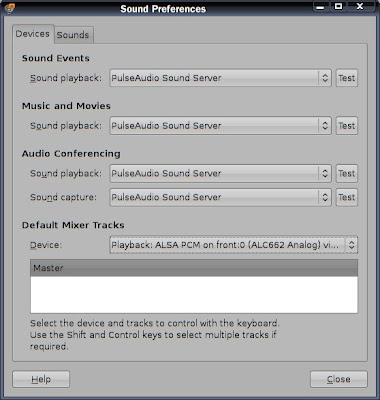
Under System > Preferences > Sound, I changed my Default Mixer Tracks to Playback: ALSA PCM on front :0 (ALC662 Analog) via DMA (PulseAudio Mixer)
Right clicked on the volume control applet in the panel > Preferences. Here, I could choose the default device and track to control. I chose the same: Playback: ALSA PCM on front :0 (ALC662 Analog) via DMA (PulseAudio Mixer). (There's only a master track).
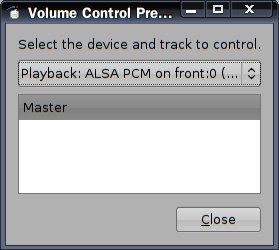
Finally, I made all the other relevant volumes 100% in all the other devices (except capture devices). Don't forget to click on the "Preferences" button to see all the tracks
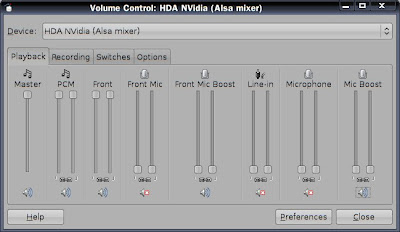
I'm essentially using only the Playback: ALSA PCM on front :0 (ALC662 Analog) via DMA (PulseAudio Mixer) for controlling my volume. I don't know why or how this works, but it works for me...
The only problem is that it won't remember my volume levels after I reboot.
Sunday, February 08, 2009
Transparent menus in Gnome using compiz
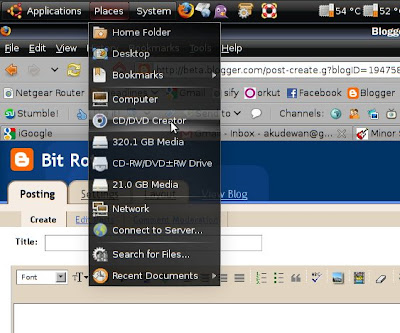
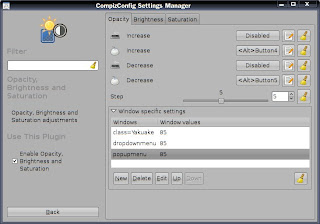
This needs installation of compizconfig-settings-manager (sudo apt-get install compizconfig-settings-manager)
Run (Alt+F2) > ccsm
Under accesibility, there' s an option called Opacity, Brightness and Saturation.
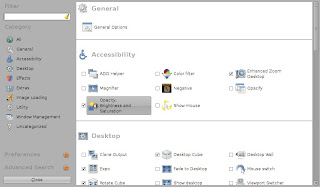
In here, under the Opacity tab, there's a section called "Window specific settings." Click on the New button. Write dropdownmenu in the Windows textbox. Set the opacity to 85 or so...
Click Close, do the same for popupmenu instead of dropdownmenu.

